
A topic like this deserves a really good post, however my two year old is moments away from waking and I really want to get this post out.
I did want to do a post on this a few months ago when it was first released, but this feature is only available via support and I felt a bit bad about sending them more work 😄
So when I asked Steve Brian (Drip’s CTO) if dynamic custom content would be something we can setup ourselves from the app without supports help, he said: “bring it on support and don’t feel bad”.
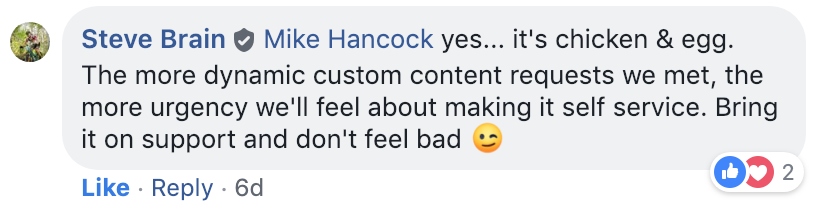
So once you finish this post, get a C.D.C. request into Drip support!
I recommend you check out the Drip API docs before getting started, you will see that the “Custom” in “Custom Dynamic Content” means that you can send parameters to your API endpoint and get certain data from your API. I’ll get back to doing that type of thing in another post, but for now, let’s just look at how to handle top-level arrays and get post data.
Getting started
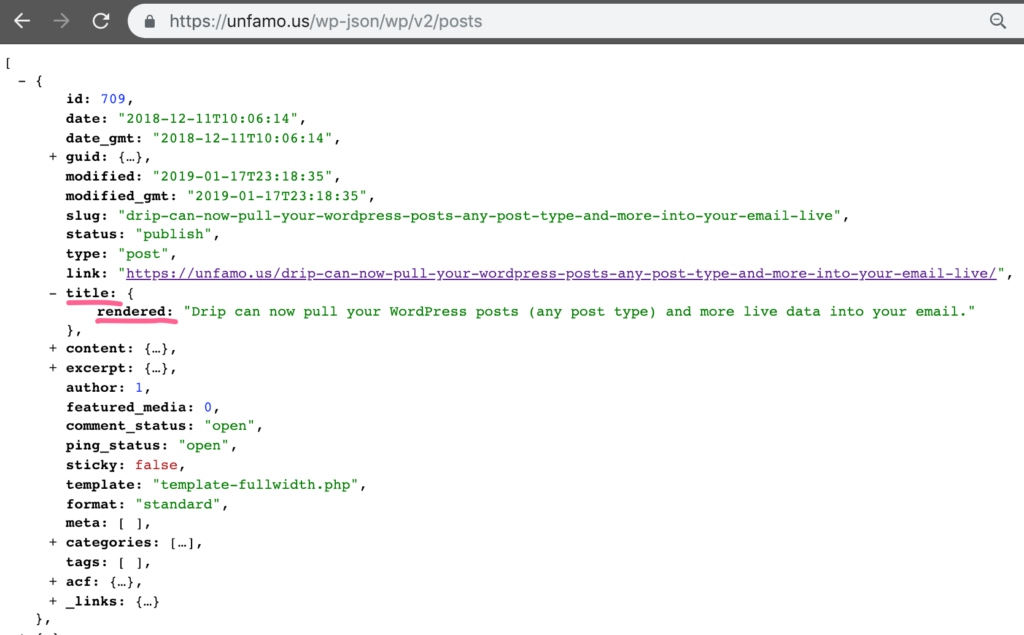
The first thing you will need to access your blog posts – WP Posts endpoint URL:
https://yourwebsite.com/wp-json/wp/v2/posts
Pop in your own domain at the start of that URL and load it up in a browser.
Something to keep in mind, this post feed will only get your 10 most recent posts, if you wanted to get more posts you can do:
https://yourwebsite.com/wp-json/wp/v2/posts?per_page=20
Read my warning below before using this one ☝
With WP, max posts per page (I think) is 100 posts. If you do more than the standard 10 posts, you run the risk of going over the 350kb document limit (which is set by Drip) and I’m not sure what happens when you do that 😄So maybe just stick with the first option (10 posts) if you can, unless your posts are very small.
Send your endpoint URL to Drip support along with your liquid shortcode name. Mine for this example is “latest_posts”. Drip kindly did the setup overnight and sent me back this Liquid:
{{my.latest_posts}}Now you have the Liquid shortcode setup – you can access your blog posts with Liquid! – but how?
Let’s start with how to get your most recent blog post title:
{% assign post = my.latest_posts[0] %}
{{post.title.rendered}}
So what is happening here? I’m assigning the post variable to the latest post in the feed. [0] references the first post object in the feed.
On the next line, I call the assigned post, “.title” references the title object inside of the post object, and “.rendered” references the rendered key inside of the Title object.
So now you have rendered the most recent blog post title.
If you wanted the most recent blog post excerpt, you would just do:
{% assign post = my.latest_posts[0] %}
{{post.excerpt.rendered}}
If you wanted the most recent blog post link, you would just do:
{% assign post = my.latest_posts[0] %}
{{post.link}}
Most recent blog post details all together:
{% assign post = my.latest_posts[0] %}
{{ post.title.rendered }}
{{ post.excerpt.rendered }}
{{ post.link }}
Next up – Loops
Want a list of your latest 3 posts? You can do that with Liquid Iteration, see here in the Liquid docs for all of the iteration options.
{% assign posts = my.latest_posts %}
{% for post in posts limit:3 %}
{{ post.title.rendered }}
{% endfor %}
Now that you understand how this works, you can get really funky:
{% assign posts = my.latest_posts %}
{% for post in posts limit:3 %}
<h2><a href="{{post.link}}">{{ post.title.rendered }}</a></h2>
<span class="date">{{post.date | date: "%B %m, %Y"}}</span>
<span class="excerpt">{{ post.excerpt.rendered }}</span>
{% endfor %}
Want more? Do you use Advanced custom fields?
So that I can add an “email header” image to my blog posts, I’ve used ACF to create a field for my blog posts called “email_image_for_post”.
By default ACF would add nothing to the JSON output, so now you will need to install a plugin called ACF to REST API.
Now you can access that field as a key in the ACF array under the post object.
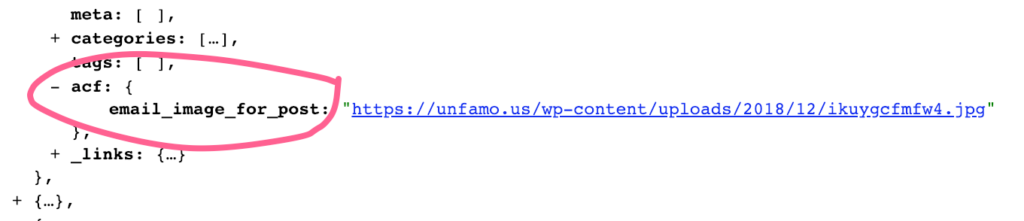
Which means, now you can add custom field data to your emails, like this:
{% assign post = my.latest_posts[0] %}
{% if post.acf.email_image_for_post %}
<img src="{{ post.acf.email_image_for_post }}" />
{% endif %}
So now you can get custom fields from custom post types and pull that live data into Drip! – this opens up a huge can of worms.
Put it all together to show 3 posts, images, titles, dates and excerpts:
{% assign posts = my.latest_posts %}
{% for post in posts limit:3 %}
<hr/>
{% if post.acf.email_image_for_post %}
<a href="{{post.link}}"><img src="{{post.acf.email_image_for_post}}" /></a>
{% endif %}
<h2><a href="{{post.link}}">{{ post.title.rendered }}</a></h2>
<span class="date">{{post.date | date: "%B %m, %Y"}}</span>
<span class="excerpt">{{ post.excerpt.rendered }}</span>
{% endfor %}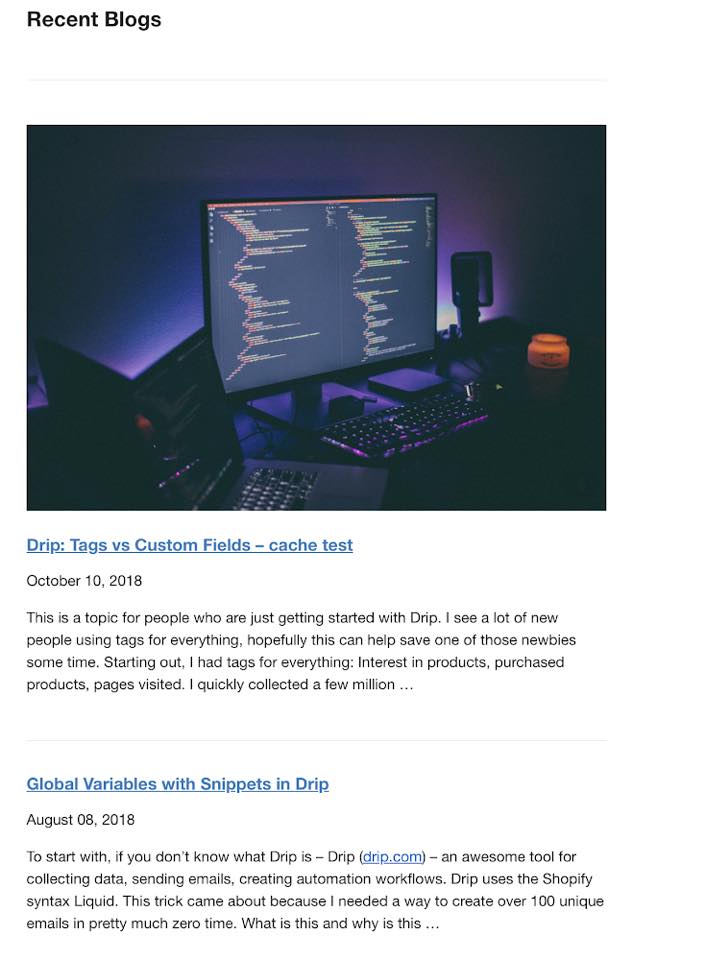
You could pop this type of thing into a content snippet and drop it into your emails whenever you need them, eg:
{{ snippets.latest_posts }}Hopefully, you found this post useful – I have so much more to share with Custom Dynamic Content.
Next, I’ll probably do a post on WooCommerce products, getting your top products etc, but I have to get going now so I’ll stop here.
While I have you!
I have been working on a WooCommerce + Drip plugin called McDrippin. It works with Drip’s Order API + tags & events.
I plan on making a free version and an extras version (which helps you create amazing Abandoned cart emails).
I’m still testing it all out and hope to have it out in the next few days.
If you would like to find out when it’s released or want to see more Drip development blog posts, please join my mailing list.
P.S. Thanks to the Drip team for releasing this awesome feature! ✌️
Last modified: March 31, 2020
When CDC changes from “Center for Disease Control” to “Custom Dynamic Content” you know this stuff is powerful. Really enjoying your skills, Mike!
😊 Thanks Anthony!! hahah mate, I’m going to write so fricken many Drip CDC posts, we’ll out-rank cdc.gov in no time 📈
P.s I put 5 CDC requests in today, RIP Drip Support 😂